I'll be honest - this is a fairly standard cookie recipe with an array of ingredients all in service to introduce a ton of baking science into the description. You don't need me to extol the values of a freshly baked cookie. Sit back and enjoy the nerd-out.
|
There are many reasons why you want to age your cookie dough, that is, to not bake it immediately, and instead let it sit in the fridge (or freezer) overnight. Claire from Curious Kitchen has a few good write-ups on some of the basic science behind baking starches and sugars, in an easily digestible format. In short, when you make a dough with sugar and flour present, you have two hydroscopic ingredients coming together to absorb water present in egg whites and any other liquids you add to your dough. When the water is absorbed into starches, it a) will activate enzymatic gluten formation in flour (autolysis - which gives us chewier cookies in texture), and b) kick-start enzymatic simple sugar conversion, all thanks to amylase. This is, of course, not a fast process and can take a few hours to fully absorb any water content - you’ll know this if you’ve baked bread, gluten formation can be a slow process. When that water content is absorbed, you wind up with a relative shift in sugar concentration, meaning you have more readily available sugar to caramelize as you bake.
King Arthur baking has several more justifications in regards to chilling/aging cookie dough, mostly in regards to cookie texture & spread. For example, a warm dough will spread a lot more than a cold dough, empirically. Higher temperature differences between the hot oven and cold solidified butter afford you extra time before the fat melts completely (which turns the batter into more of a liquid, which spreads easier) and when the starches fully gelatinize and set, resulting in a much taller cookie. Levain bakery has done a ton of work to popularize taller, more stout cookies in recent years (they also give you CHONKERS in terms of dough ball weights, but that’s a different story), but you can achieve some level of height, and in turn, chew with some science in the kitchen. I want to add in another aged dough effect that isn’t talked about as much: pH modifiers. We add baking soda and powder to baked goods primarily for leavening - that is to give airiness to a baked good that a gluten matrix can hold onto. But there’s a hidden benefit here too, high pH environments can accelerate browning reactions like the Maillard reaction and caramelization. In the case of sugar caramelization, you hit enhanced browning much quicker as you stray from neutral pH on the basic side than you would on the acidic side (acidic enhancement happens below pH 3, basic enhancement occurs above pH 9 - neutral pH is 7 [1]). You see this in classic Cantonese techniques and in somewhat contemporary tips from America’s Test Kitchen on how to improve browning of meat by adding some baking soda to modify the pH. Much like the somewhat slow process of starch hydration, pH modification can take some time as well, if you’ve ever used pool shock, you’ll know that this isn’t an instantaneous process, even for purely aqueous solutions - now imagine that this is also the case for fairly non-aqueous distribution of basic cations in a dough made of flour and eggs. Allowing your dough to come to an equilibrium pH above 7 via the addition of baking soda and powder (eggs whites and dark chocolate are also fairly basic) can help your cookies develop more browning, and in turn, more complex flavor from the Maillard reaction and caramelization. Browned butter is having its moment in the sun right now for baked goods - browned milk solids add yet another source non-enzymatic browning to supply depth of flavor, and it comes for free with melting butter, since butter is around 2% by weight milk solids in the form of random bits of protein. Some recipe developers also suggest the addition of malted milk powder to further boost the amount of available milk solids to brown and provide flavor. However, if you’re like me, you’re settling for vegan butter alternatives, which are usually hydrogenated oil cocktails that are solid at room temperature with an *unspecified* amount of protein powder mixed in. Without knowing the exact (likely trade secret and copyrighted) concentration in these butter alternatives, I wanted to try to replicate this effect by simply adding unflavored pea protein isolate (protein powder) to the butter while I brown it to get it *near* 2% (likely a little bit higher, but that’s ok) concentration. In layperson’s terms, for every stick of “butter” you use, add 5-6 grams of protein powder - this winds up being about a quarter scoop of your favorite protein powder. I have supplied a video companion in this post, and you can notice slight browning occurring in the time lapse after I add the powder into the butter. |
Hardware:
Serving Suggestions:
Shopping List:
|
Prep:
Whisk together the dry ingredients (AP flour, corn starch, baking soda, baking powder, and salt). Set this aside.
Make the brown "butter". Over medium-low heat in a nonstick skillet, melt the buttery stick and whisk in the protein powder, cooking for a few minutes or until most of the bubbling has subsided - you should also notice a slight change in color too. You don't have to let this cool at all.
Whisk the brown butter into the salt, white sugar, and brown sugar. After combining with the sugar, the temperature of the butter should have dropped significantly, so whisk in both eggs and the vanilla paste/extract.
Chop the chocolate bar into 1cmx1cm chunks (your preference here really, but leave the chunks visible so you get some chocolate pooling in your cookies). If your cranberries seem a bit large, give them a rough chop too, and same with the walnut pieces.
Add your dry ingredients into the sugar and egg mixture, stirring until more or less uniform. Add in the chocolate chunks, cranberries, and walnuts. This is a fairly wet dough, but remember we will be aging it in the fridge overnight, so it will become less sticky and easier to work with.
Spread the dough onto a large rectangle of parchment paper or wax paper, roll into a log, and tightly seal the ends. You could also leave this as a slab in a parchment parcel, just make sure it's not exposed to direct air. Refrigerate this overnight. I like to allow the dough to fully hydrate before popping it in the freezer. If making a double batch, refrigerate the entirety of the dough overnight before tossing into the freezer.
The Business:
The next day, preheat your oven to 385 deg F. Most cookies are baked at 350 deg F, but I like the somewhat faster bake here so it stays a little fudgier in the center of the cookie.
Portion your chilled dough into 55g discs, roughly the thickness of your thumb (1" or so), and place onto a baking tray prepared with a silicone mat. Parchment should work here, just keep an eye out for a little extra browning compared to the insulative silicone mat.
Sprinkle each dough disc with a hefty pinch of flaky sea salt.
Contemporary cookie bakers will have you probe the center of the cookie for doneness, but I also just keep an eye out for color and wobble. Bake 6 of these at a time for 12-14 minutes at 385 deg F. The center of my cookies came out at around 170 deg F, and will continue carryover cooking out of the oven, landing you in the 180s. These cookies turn out pretty well domed with a chewy center and somewhat crispier sides. For a more uniformly baked cookie (and slightly browner on average - read: not as gooey), bake at 350 deg F for 16 minutes instead.
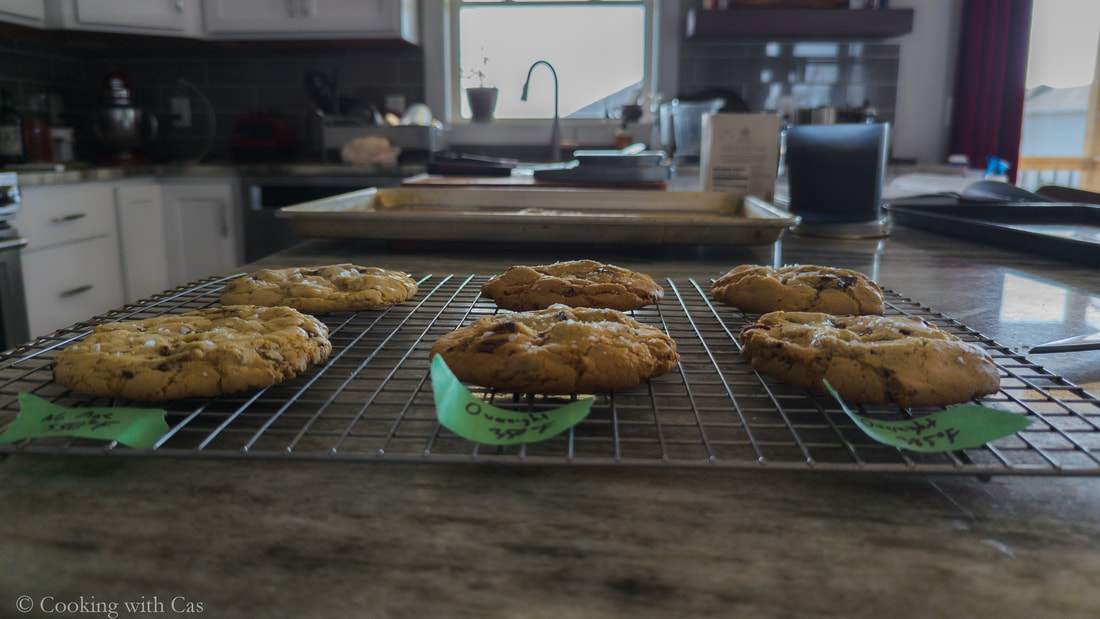
Cool 1-2 minutes on the tray, then transfer to a wire rack to finish cooling.
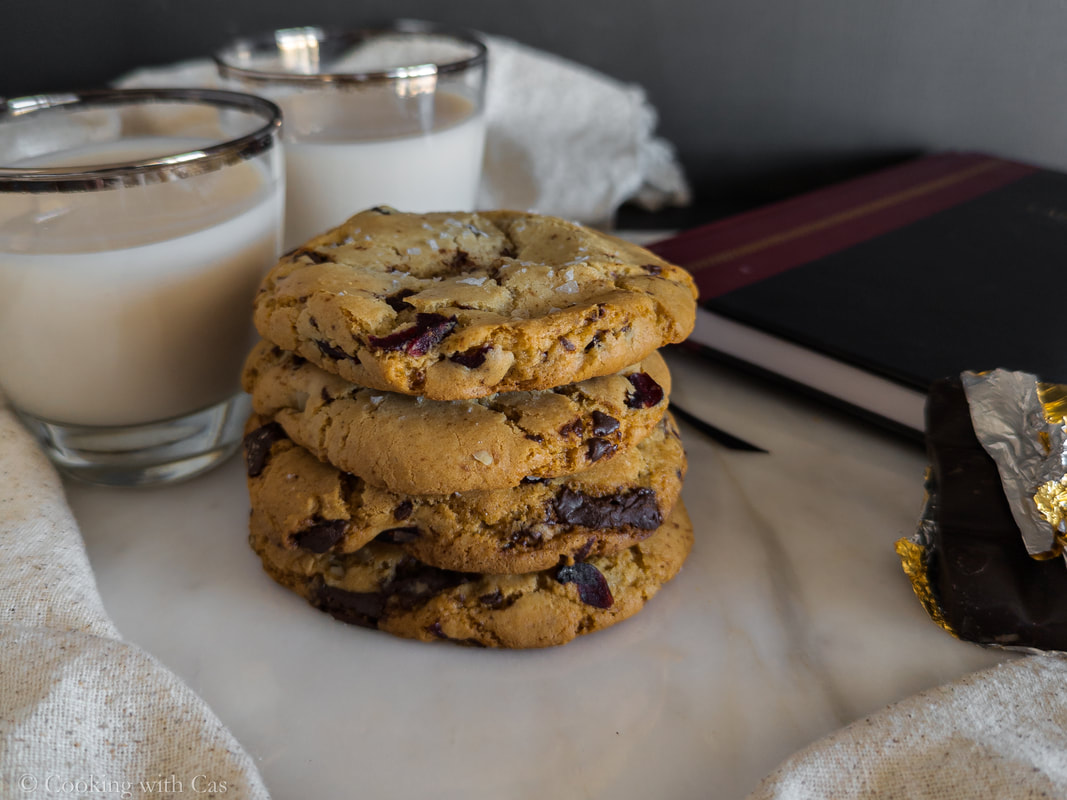
This recipe makes ~18 cookies, give or take the obligatory chef snack on the cookie dough (I'll make a hand-waving argument here that the flour gets "cooked" enough from the warm butter - it probably doesn't LOL).
Enjoy!
Whisk together the dry ingredients (AP flour, corn starch, baking soda, baking powder, and salt). Set this aside.
Make the brown "butter". Over medium-low heat in a nonstick skillet, melt the buttery stick and whisk in the protein powder, cooking for a few minutes or until most of the bubbling has subsided - you should also notice a slight change in color too. You don't have to let this cool at all.
Whisk the brown butter into the salt, white sugar, and brown sugar. After combining with the sugar, the temperature of the butter should have dropped significantly, so whisk in both eggs and the vanilla paste/extract.
Chop the chocolate bar into 1cmx1cm chunks (your preference here really, but leave the chunks visible so you get some chocolate pooling in your cookies). If your cranberries seem a bit large, give them a rough chop too, and same with the walnut pieces.
Add your dry ingredients into the sugar and egg mixture, stirring until more or less uniform. Add in the chocolate chunks, cranberries, and walnuts. This is a fairly wet dough, but remember we will be aging it in the fridge overnight, so it will become less sticky and easier to work with.
Spread the dough onto a large rectangle of parchment paper or wax paper, roll into a log, and tightly seal the ends. You could also leave this as a slab in a parchment parcel, just make sure it's not exposed to direct air. Refrigerate this overnight. I like to allow the dough to fully hydrate before popping it in the freezer. If making a double batch, refrigerate the entirety of the dough overnight before tossing into the freezer.
The Business:
The next day, preheat your oven to 385 deg F. Most cookies are baked at 350 deg F, but I like the somewhat faster bake here so it stays a little fudgier in the center of the cookie.
Portion your chilled dough into 55g discs, roughly the thickness of your thumb (1" or so), and place onto a baking tray prepared with a silicone mat. Parchment should work here, just keep an eye out for a little extra browning compared to the insulative silicone mat.
Sprinkle each dough disc with a hefty pinch of flaky sea salt.
Contemporary cookie bakers will have you probe the center of the cookie for doneness, but I also just keep an eye out for color and wobble. Bake 6 of these at a time for 12-14 minutes at 385 deg F. The center of my cookies came out at around 170 deg F, and will continue carryover cooking out of the oven, landing you in the 180s. These cookies turn out pretty well domed with a chewy center and somewhat crispier sides. For a more uniformly baked cookie (and slightly browner on average - read: not as gooey), bake at 350 deg F for 16 minutes instead.
Cool 1-2 minutes on the tray, then transfer to a wire rack to finish cooling.
This recipe makes ~18 cookies, give or take the obligatory chef snack on the cookie dough (I'll make a hand-waving argument here that the flour gets "cooked" enough from the warm butter - it probably doesn't LOL).
Enjoy!

Giving you an idea of final dough consistency - should feel a little on the wet side before chilling (remember that most of this water will be absorbed by the flour over time).
Notice the difference in rise as a function of aging and bake temperature (no age, 350 deg F on left, overnight age, 350 deg F in the middle, overnight age, 385 deg F on the right). Notice dramatic difference between left pair and a more subtle but still noticeable difference in the right pair.
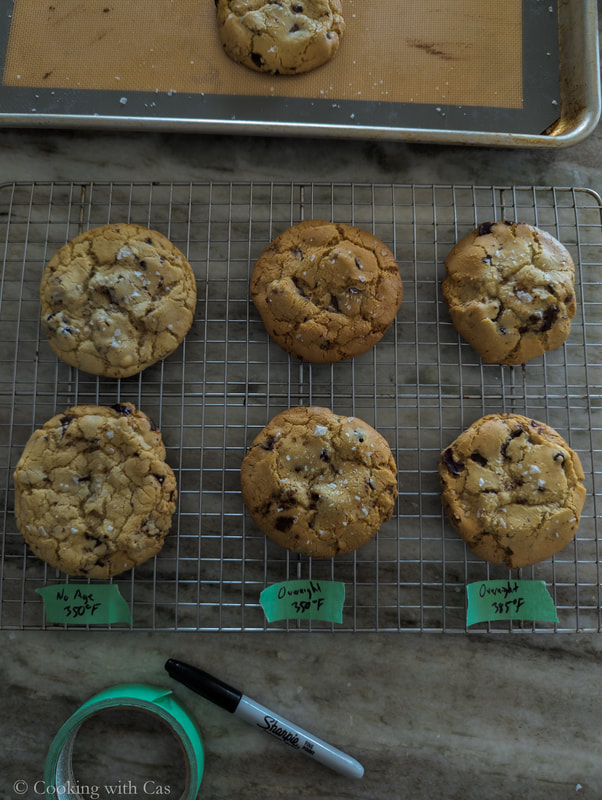
Same details as above image, but to show enhanced browning for the different tests.