Sometimes you really just want a frozen dessert. I don't or shouldn't have to justify it. Upgrade from the angelic top tub to this indulgent homemade treat.
|
Frozen custard is one of those seemingly hipster-ified items when you really look at the ingredients, thinking: “Is there really a difference between this and regular ice cream?” Throw in the buzzword ‘no churn’, and you’ve got yourself a hot (GET IT) ticket.
We're going to exploit the hell out of some thermodynamic properties and phenomena in this recipe. This also works extremely well after a blizzard, or if you just live in Canada, that's how that works right? Shopping List (Mint Chocolate Cookie Crumbs):
Shopping List (Coconut Custard):
|
Hardware:
|
Prep:
The mint chocolate cookies (that we’ll wind up pulverizing into dust) can be made way ahead of time, and really you want all of your attention to the frozen custard when that gets going. These are a simple, thin, crumbly cookie and not at all sustainable if you want to make copycat versions of the favorite cookies & cream, you might want to look elsewhere. The powdered sugar in this dough may also look out of place, but there’s some logic behind it; you want as crisp of a wafer as possible, so the less ‘butter’ or fat that is ‘creamed’, the better, as it creates pockets of air to expand in the dough.
Preheat your oven to 350 deg F.
In your stand mixer, combine the coconut oil, “butter”, and powdered sugar over low speed unless you enjoy powdered sugar on every surface of your kitchen. Add the mint extract, cocoa powder, and salt, mix to combine. You may have to scrape down the bowl a few times, as you’re dealing with a relatively dry dough so far. Even moreso once you start adding flour.
Working ¼ c. at a time, add the flour until the dough cleanly comes off the side of the bowl. If you read my recipe on Italian anisette cookies, you’re looking for a similarly tacky texture. Not sticky, but will definitely pinch off well. I mix this on a low speed until just combined as to not build gluten as readily (even though there’s hardly any moisture).
Turn the dough out onto a floured surface and roll out to as thin as you can (I tend to go with 1/8” thick rectangles). Again, we’re not looking for this to stay cohesive really, so don’t worry about it breaking apart and crumbling at the edges. I like slicing the Transfer the dough to your baking tray , leaving ½” gap in between chunks (this won’t expand much, but if the pieces are too big, they won’t properly crisp.
Bake these at 350 deg F for 14-15 minutes until firm on the bottom. A dark brown cookie will be extremely hard to tell doneness, so just trust the timing. They will solidify more as they cool, especially if you leave them in the pan. You ARE just going to crunch them up anyway.
Take half of the cookies and break them by hand to garnish and serve (read: snack on while freezing) with. Take the other half and use your favorite method for crunching these into small particles. Food processor, bag plus rolling pin, whatever. You're not looking for a powder but you don't want huge chunks to mix into the frozen custard.
The cookie crumbles are done. Keep in a sealed container until ready to use.
The Business:
If it's winter, go grab about a kilogram of fresh snow from outside. Place this in the largest bowl you own. Sprinkle in and attempt to mix in 100g of kosher salt to make a roughly 10% molality solution of ice and salt. Doing this will lower the freezing temperature of the water by about 6°C, helping any ice that melts resolidify back into ice at a much colder temperature than the regular freezing point of water. There is also a distinct benefit to using snow, the much tighter pack you can keep better contact with the bowl, making it easier to draw heat out of the custard mixture (thanks thermodynamics!). Hollow out a hole in the center that is large enough to fit the bowl you plan on making the custard in.
Over low heat, bring the coconut milk to 170 deg F. While that is heating up, vigorously whisk the sugar and egg yolks together until dissolved, and has turned a much paler yellow color. Then add in the viscous corn syrup, this will discourage large crystals of ice from forming (not completely inhibit, but every edge helps). You didn't add this with the sugar because it's viscous and would've been a pain to incorporate.
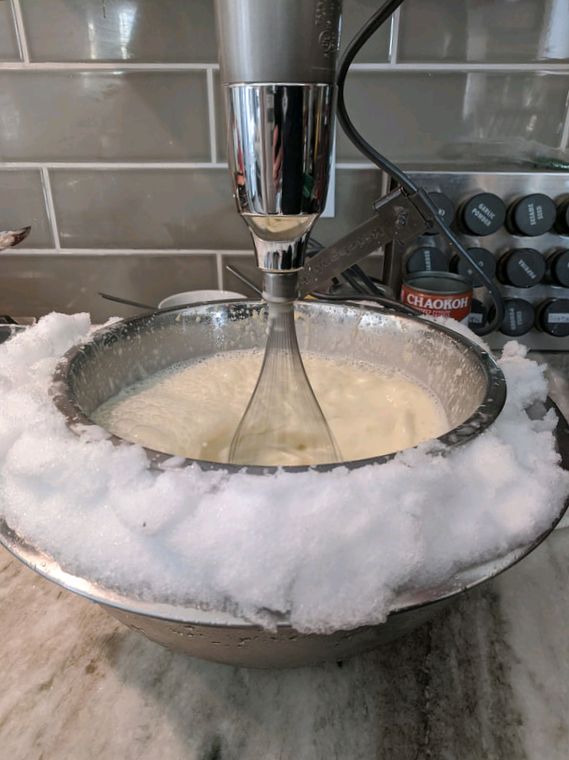
Temper the egg and sugar mixture. To do this, slowly stream in a ladle of warm coconut milk, whisking the entire time. This prevents your eggs from scrambling as you've read in a bajillion other blogs. After a ladle or two you should be good to slowly pour in the rest of the coconut milk, again whisking the entire time. Set the bowl of custard down into the hollowed bowl of snow and start whisking. What you're doing here is rapidly cooling the custard mixture to, again, discourage large ice crystal formation because larger crystals form at much slower temperature gradients. Rapidly cooling a liquid will lead to extremely fine crystals of iceReally ice cream and frozen custard is a textbook example of statistical mechanics and thermodynamics.
You don't have to be judicious about whisking like mad here, but keep the mixture moving until the custard hits 20-25 deg F. Change the snow mixture warms up too much (ideally it won't as the snow should be well into the single digit Fahrenheit temperatures). By now, your custard should be thickening and you can transfer into the baking tray. Cover this tightly with plastic wrap (all the way touching the custard mixture).
Transfer to the freezer for 15 minutes to firm up a little more.
Stir in the pulverized cookie bits to combine, and return to the freezer to deep freeze and to store. Ideally the custard was thick enough to suspend the pulverized bits rather than having them sink to the bottom as they normally would if you incorporated them earlier. Check it after another 20 minutes or so and see if the chunks are well distributed amongst the frozen custard; if they aren't, give it a stir to redistribute and return to the freezer.
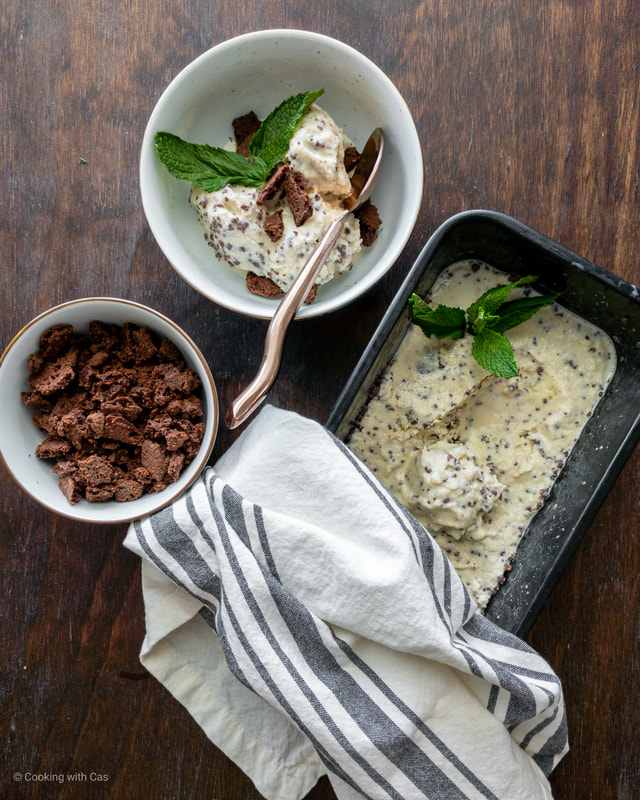
Just like any frozen custard or ice cream, it helps to defrost on the counter for 5-10 minutes to soften for scooping. Garnish with the larger chunks of cookie, some fresh mint optionally, and enjoy!
The mint chocolate cookies (that we’ll wind up pulverizing into dust) can be made way ahead of time, and really you want all of your attention to the frozen custard when that gets going. These are a simple, thin, crumbly cookie and not at all sustainable if you want to make copycat versions of the favorite cookies & cream, you might want to look elsewhere. The powdered sugar in this dough may also look out of place, but there’s some logic behind it; you want as crisp of a wafer as possible, so the less ‘butter’ or fat that is ‘creamed’, the better, as it creates pockets of air to expand in the dough.
Preheat your oven to 350 deg F.
In your stand mixer, combine the coconut oil, “butter”, and powdered sugar over low speed unless you enjoy powdered sugar on every surface of your kitchen. Add the mint extract, cocoa powder, and salt, mix to combine. You may have to scrape down the bowl a few times, as you’re dealing with a relatively dry dough so far. Even moreso once you start adding flour.
Working ¼ c. at a time, add the flour until the dough cleanly comes off the side of the bowl. If you read my recipe on Italian anisette cookies, you’re looking for a similarly tacky texture. Not sticky, but will definitely pinch off well. I mix this on a low speed until just combined as to not build gluten as readily (even though there’s hardly any moisture).
Turn the dough out onto a floured surface and roll out to as thin as you can (I tend to go with 1/8” thick rectangles). Again, we’re not looking for this to stay cohesive really, so don’t worry about it breaking apart and crumbling at the edges. I like slicing the Transfer the dough to your baking tray , leaving ½” gap in between chunks (this won’t expand much, but if the pieces are too big, they won’t properly crisp.
Bake these at 350 deg F for 14-15 minutes until firm on the bottom. A dark brown cookie will be extremely hard to tell doneness, so just trust the timing. They will solidify more as they cool, especially if you leave them in the pan. You ARE just going to crunch them up anyway.
Take half of the cookies and break them by hand to garnish and serve (read: snack on while freezing) with. Take the other half and use your favorite method for crunching these into small particles. Food processor, bag plus rolling pin, whatever. You're not looking for a powder but you don't want huge chunks to mix into the frozen custard.
The cookie crumbles are done. Keep in a sealed container until ready to use.
The Business:
If it's winter, go grab about a kilogram of fresh snow from outside. Place this in the largest bowl you own. Sprinkle in and attempt to mix in 100g of kosher salt to make a roughly 10% molality solution of ice and salt. Doing this will lower the freezing temperature of the water by about 6°C, helping any ice that melts resolidify back into ice at a much colder temperature than the regular freezing point of water. There is also a distinct benefit to using snow, the much tighter pack you can keep better contact with the bowl, making it easier to draw heat out of the custard mixture (thanks thermodynamics!). Hollow out a hole in the center that is large enough to fit the bowl you plan on making the custard in.
Over low heat, bring the coconut milk to 170 deg F. While that is heating up, vigorously whisk the sugar and egg yolks together until dissolved, and has turned a much paler yellow color. Then add in the viscous corn syrup, this will discourage large crystals of ice from forming (not completely inhibit, but every edge helps). You didn't add this with the sugar because it's viscous and would've been a pain to incorporate.
Temper the egg and sugar mixture. To do this, slowly stream in a ladle of warm coconut milk, whisking the entire time. This prevents your eggs from scrambling as you've read in a bajillion other blogs. After a ladle or two you should be good to slowly pour in the rest of the coconut milk, again whisking the entire time. Set the bowl of custard down into the hollowed bowl of snow and start whisking. What you're doing here is rapidly cooling the custard mixture to, again, discourage large ice crystal formation because larger crystals form at much slower temperature gradients. Rapidly cooling a liquid will lead to extremely fine crystals of iceReally ice cream and frozen custard is a textbook example of statistical mechanics and thermodynamics.
You don't have to be judicious about whisking like mad here, but keep the mixture moving until the custard hits 20-25 deg F. Change the snow mixture warms up too much (ideally it won't as the snow should be well into the single digit Fahrenheit temperatures). By now, your custard should be thickening and you can transfer into the baking tray. Cover this tightly with plastic wrap (all the way touching the custard mixture).
Transfer to the freezer for 15 minutes to firm up a little more.
Stir in the pulverized cookie bits to combine, and return to the freezer to deep freeze and to store. Ideally the custard was thick enough to suspend the pulverized bits rather than having them sink to the bottom as they normally would if you incorporated them earlier. Check it after another 20 minutes or so and see if the chunks are well distributed amongst the frozen custard; if they aren't, give it a stir to redistribute and return to the freezer.
Just like any frozen custard or ice cream, it helps to defrost on the counter for 5-10 minutes to soften for scooping. Garnish with the larger chunks of cookie, some fresh mint optionally, and enjoy!
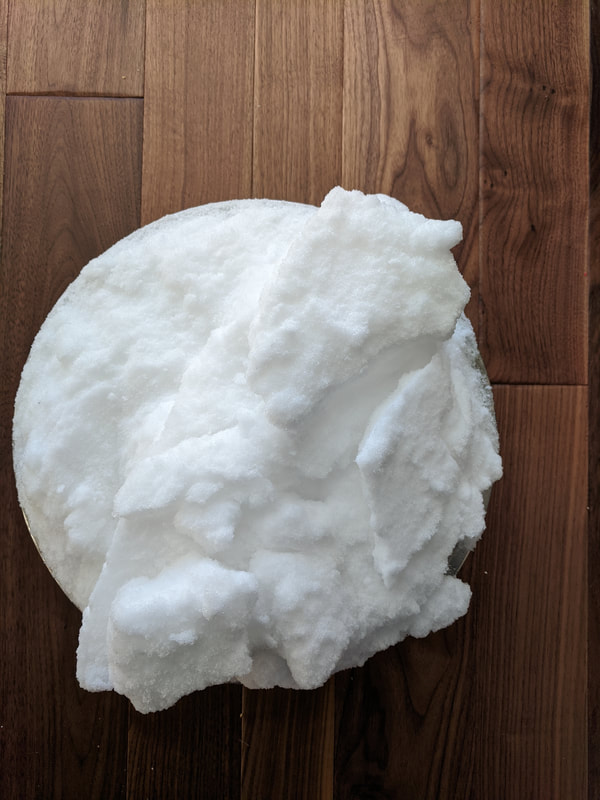
Snow, approx 1 kg.